GE Washer Fault Code List – A Complete List of Error Codes and Their Explanation
Washing machines use logical circuits and have a bunch of sensors to automate the washing process. Also, these sensors and circuits help us monitor the washer’s integrity.
Whenever there is an issue with any part of the washer, these logical circuits display error codes to the user. These error codes help us to understand which part of the washer is causing the trouble. Therefore, understanding this error code will help us to diagnose the problem with our washing machine.
In this article, we will learn the list of fault codes a GE washer may display when encountering an issue. We shall know the complete list of fault codes for both front load and top load washers with and without display.

GE Washer Fault Code List
A GE washer can display 27 different fault codes in a front load washer with a display and 26 different error codes in a washer without a display.
There are two ways in which the error code is displayed to the user and it depends upon the model used.
If you are using a washer with a display, the error code number will be directly shown and you can refer to the problem from the list given in Table 1.1.
If you are using a washer without a display, then you will have binary lights that light up in a particular sequence. You have to refer to the sequence with the list given in Table 1.2 and know the problem.
First, we will discuss the list of error codes for a GE washer that has a display to show the code directly.
GE Washer Error Code List – For Front Load and Top Load Washers with a Display
| Error Code | Problem |
|---|---|
| E22 | Water filling very slowly – Takes more than 8 minutes |
| E23 | Overflow of Water |
| E31 | Very Slow drainage of water indicating an issue with the drain pump or drain hose |
| E38 | Fault in the Dispenser (Proper Reservoir not found) |
| E39 | Dispenser not working |
| E42 | Drive motor draws excess of current |
| E45 | Speed of the Motor not Proper or No Feedback from the Motor |
| E46 | Excess temperature of Drive Motor |
| E47 | Excess temperature in heat sink |
| E48 | Drive motor winding is open |
| E4A | Under Voltage in Inverter |
| E4B | Software or Hardware issues causing problems with powering up |
| E4C | Over Voltage in inverter |
| E50 | Sudden fault in motor causing problems with drive or control interface |
| E52 | The control circuit lost communication with the drive motor after initial communication |
| E54 | Completely no communication between the Control and the Motor |
| E56 | The control circuit reset unexpectedly |
| E57 | Mainboard failure causing software error |
| E58 | Communication error with Mainboard |
| E60 | Door Lock switch failure while locking |
| E61 | Door Lock switch failure while unlocking |
| E62 | Shorted Component causing system contact failure. The component may be the Heating element / Pump / Pressure sensor / door lock / Inlet water valves / Dispenser motor |
| E63 | The door lock switch fails when powering up |
| E64 | The door lock switch fails during a wash cycle |
| E65 | The pressure sensor that measures the water level is not working |
| E66 | The water temperature sensor not working |
| E67 | The water temperature sensor short-circuited |
These are the error codes you may witness in a GE washer that has a display. Do not solely rely on the error codes and replace any part. The error codes may arise due to the control board sending or getting false signals. Each error code just indicates the part that has a problem and you can start troubleshooting them before you reach any conclusions.
Let us now look at the list of error codes indicated by binary lights in a GE washer without a display.
GE Washer Error Code List Binary – For GE washers without display
| Fault Code | Binary Light Code | Problem |
|---|---|---|
| 1 | 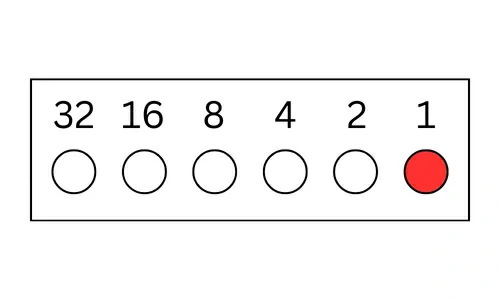 | Lid Lock connection not available for Control Circuit |
| 2 | 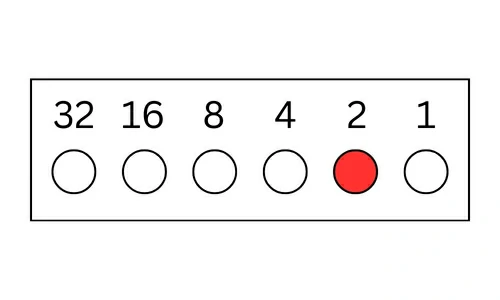 | The lid switch did not close or the lid switch signal was not obtained |
| 3 | 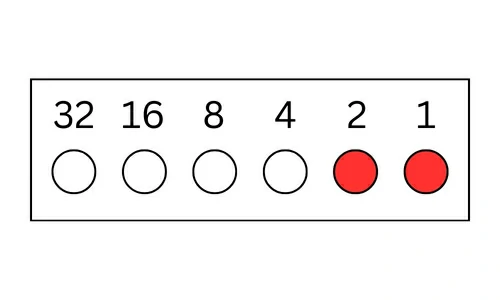 | No sign of motor turning for more than 5 seconds |
| 4 |  | Control resetting automatically |
| 5 | 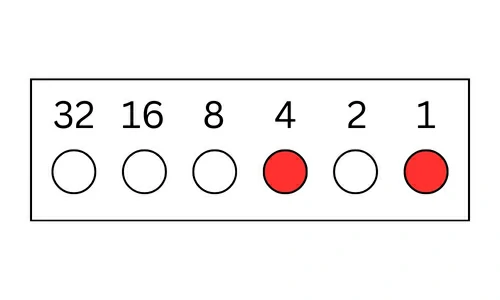 | No transition from agitate to spin or vice-versa occurred |
| 6 | 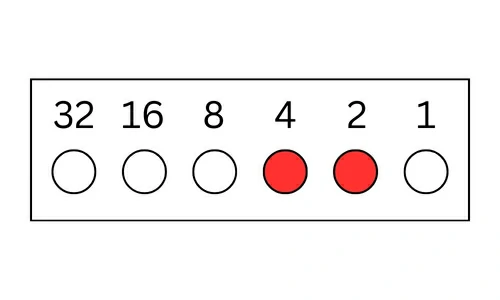 | Overflowing of water indicated by high pressure (Critical Signal) |
| 7 | 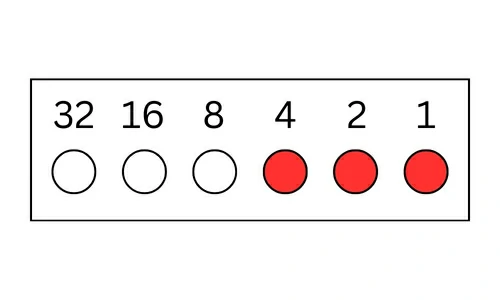 | Overflow of water indicated by a pressure level of more than 16.5 inches |
| 8 |  | Pressure sensor not working |
| 9 | 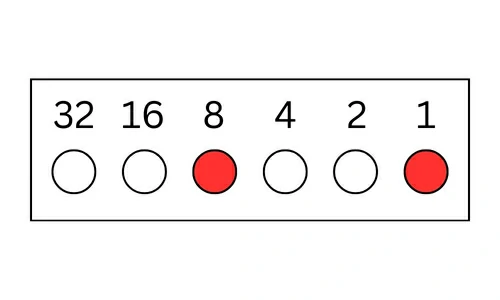 | Lid switch not sending a signal in the middle of the cycle |
| 10 | 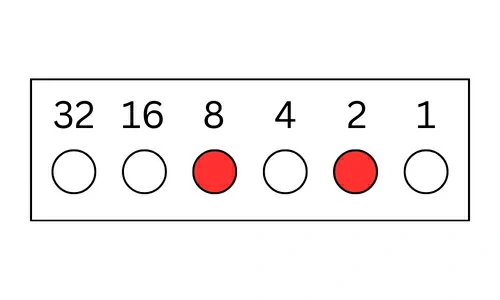 | Mismatch between the mode shifter and control circuit / Agitator rotating faster |
| 11 | 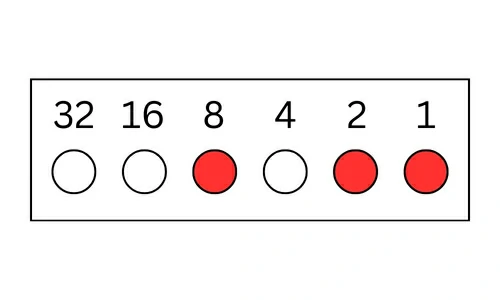 | AC signal frequency is not 60Hz or Software failure |
| 12 |  | Excess of water indicated by pressure reading more than 18 inches |
| 13 | 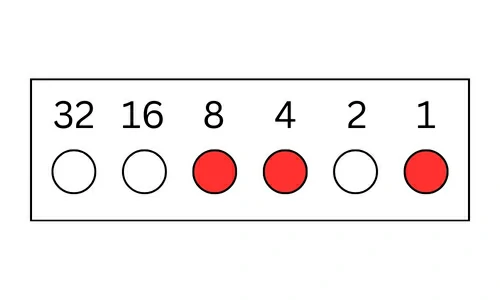 | Lid unlocked redundantly in the spin cycle |
| 14 | 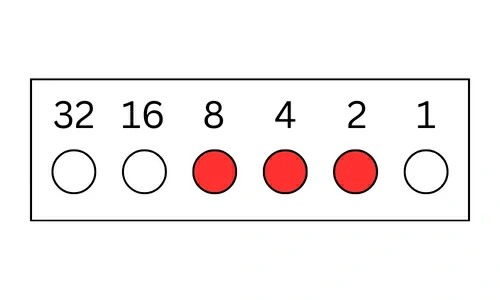 | Lid lock not locking or unlocking when indicated by the control circuit |
| 15 | 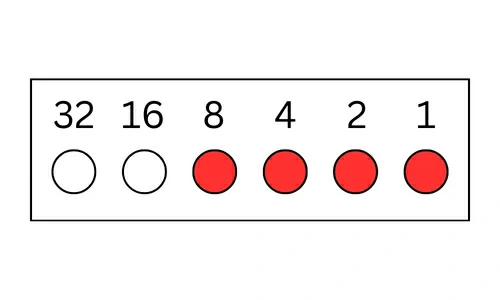 | The water temperature sensor not working or disconnected |
| 16 | 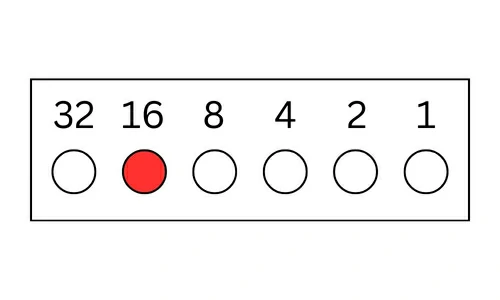 | Slow drainage of water |
| 17 | 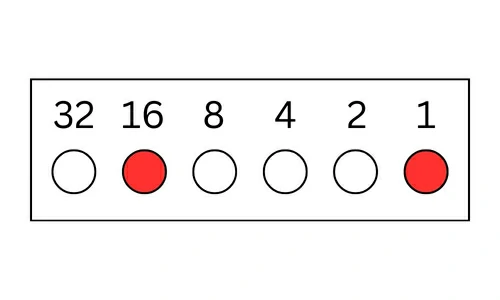 | Could not sense dry load after spinning since target spin speed was not reached |
| 18 | 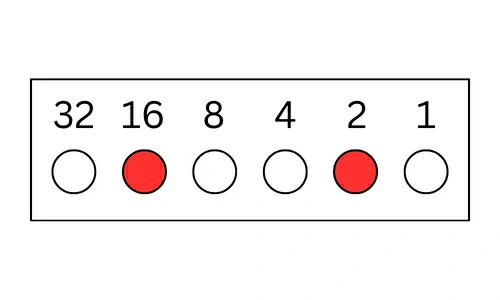 | The drain pump is not emptying the tub |
| 19 | 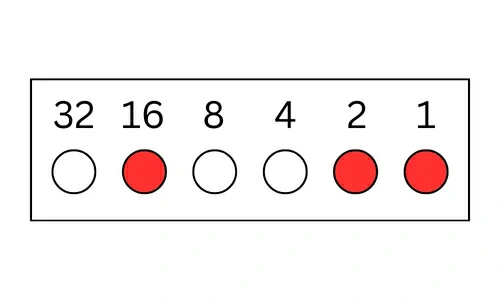 | User Interface got time out indicating the washer was paused for more than 12 hours |
| 20 | 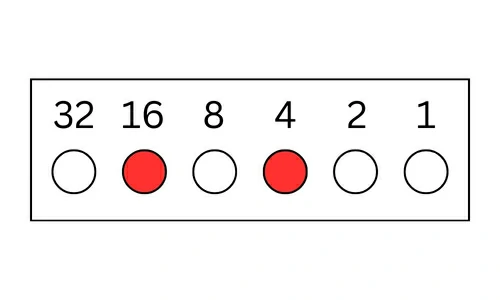 | More than 40 Gallons of water in the tub if Fault no.12 occurs or the Pressure system is blocked |
| 21 | 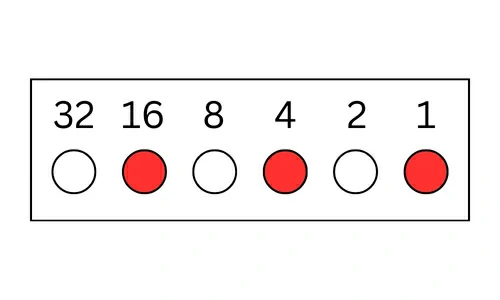 | More than 36.3 Gallons of water in the tub if fault no. 6, 7, or 12 occurs or the pressure system is blocked |
| 22 | 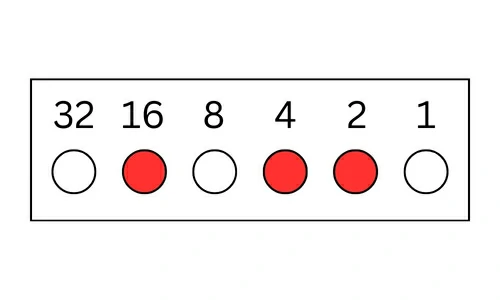 | The washer got out of balance when drying the load and senses it as a wet load |
| 23 | 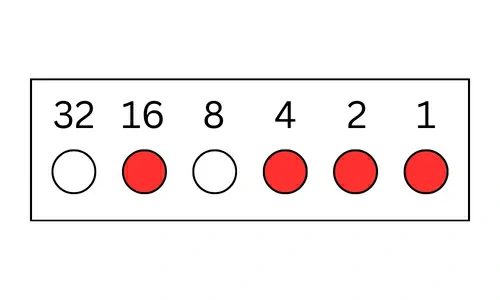 | The lid lock is blocked |
| 24 | 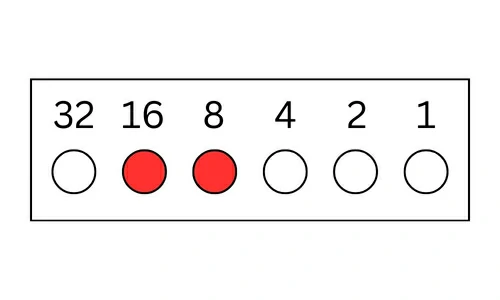 | The logical circuit of the Lid lock failed which is indicated by consecutive opening and locking for 5 seconds |
| 25 |  | Pressure sensor not working due to disconnected pressure hose or pinched pressure tube or sensor fault |
| 26 | 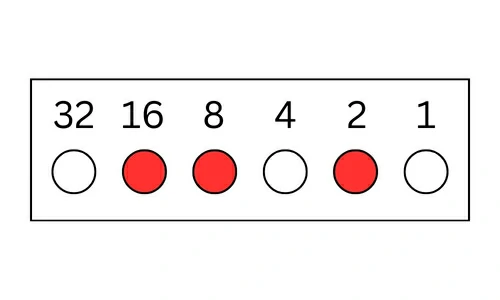 | Out of balance load preventing the washer from achieving the final target spin speed |
Now that we know the list of error codes in a GE washer, we will understand how to enter into diagnostic mode and navigate these error codes.
How to Enter into Diagnostic Mode or Test Mode in a GE Washer?
Entering into the diagnostic mode in a GE washer will enable you to navigate all the fault codes in the washer. Because you may have more than one fault in the washing machine and it will be represented with more than one code. Therefore, you must enter into the test mode and navigate the error codes to rectify the issue with the appliance effectively.
Entering Test Mode in GE Washer with Display
- You can use this method with all front-load and top-load washers with a sophisticated display and a selector knob.
- First, unplug the washer and wait for thirty seconds for the main control board to reset
- Then, plug the washer back and turn it on
- Hold the start/pause button and turn the selector knob counter-clockwise 180 degrees. In some models, you have to sequentially press the Temp and Delay wash buttons or Signal and Extra rinse buttons or Temp and Delay start buttons to enter test mode.
- Then release the start/pause button. After three seconds all the lights will start to blink indicating the entry into test mode
- Now if you are in Mode 0 by default, then you must turn the dial clockwise and choose Mode 1. Then press the start/pause button to enter fault codes
- If you are in Mode 1 or t01, then move to Mode 2 or t02 to enter fault codes
- Once you enter the fault code mode, turn the dial clockwise to navigate all the error codes in the washer
- Check the error code number in Table 1.1 and know the problem in your washer
Entering Test Mode in GE washer without Display
- First, unplug the washer and wait for thirty seconds
- Then plug the washer back and press and hold the start button for 10 seconds
- When you are pressing the start button, turn the cycle selection knob counter-clockwise 180 degrees. Then release the button
- Now after 3 seconds, all the lights will blink indicating the entry into test mode
- Turn the cycle selection knob clockwise to navigate the test mode
- At first, all the lights will be lit up. Now turn the knob clockwise once and only one light at the right end will be lit. This indicates the fault code mode. Press start to enter it.
- You can now turn the knob clockwise and navigate all the error codes.
- Note down the lights that are lit up when navigating and check Table 1.2 to know the fault code and its respective problem
Using this guide, you can now diagnose the problem or do maintenance of your washing machine easily. Although these fault codes do not give the complete picture, they give us an indication to troubleshoot. It is very handy to know these error codes so that you can try to DIY the troubleshooting before calling a technician.


